Mail or Jail Check Customer IDs
Stop silent mistakes before wrong deliveries end your Mail or Jail shift.
Why ID checks define Mail or Jail
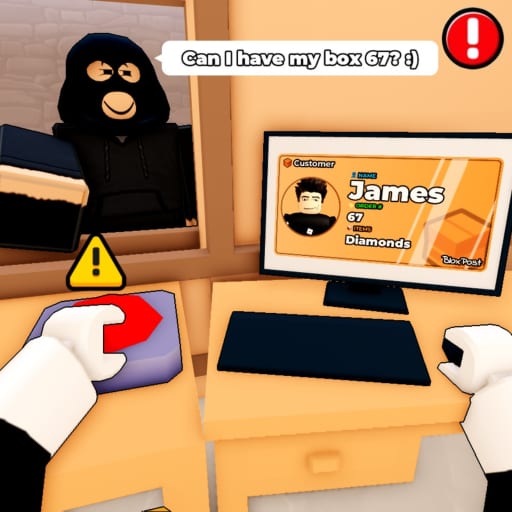
Delivery Day Studios built Mail or Jail (place 70663806238212, universe 10450718227) as a precision simulation, not a mindless clicker. Every customer at your counter should present an ID card that matches the package label you hold. Skip a field — name spelling, apartment number, photo likeness — and the game logs a mistake toward FIRED.
Of all skills in the seven-shift career, checking customer IDs carefully has the best mistake-to-time ratio. Players who rush after unloading the truck often look efficient until the end-of-shift review lists three wrong handoffs. This guide teaches a repeatable verification ritual that works on desktop, mobile, tablet, and console.
If you are brand new, read How to play Mail or Jail first for loop context, then return here before shift two.
The three-way match rule
Treat every delivery as a triangle:
- Customer model standing at the desk (clothes, hair, height cues)
- ID card UI (legal name, ID number, address line, photo)
- Package label (recipient name, unit number, special flags)
All three must agree before you press confirm. If any leg conflicts, stop. Ask the customer to re-present ID (in-game interaction) or pull the next package from the sorting pile until labels align.
Never assume two similar avatars are interchangeable — busy servers love spawning lookalikes to punish autopilot.
Step-by-step verification ritual
Use the same order every time so muscle memory carries under random event pressure:
Step 1: Read the package label first
Before engaging the customer, note the recipient name and unit. Hold that string in memory while you open their ID. Label-first prevents anchoring on whoever queued fastest.
Step 2: Open the ID panel fully
Expand the card UI until photo and address are visible. On mobile, pinch-zoom if text is tiny — misreads count as player errors, not UI excuses.
Compare first and last name separately. Mail or Jail sometimes differs by middle initial or hyphenation.
Step 3: Match photo to avatar
Photos are stylized but intentional. Hair color swaps and wrong face gender are red flags. If the photo does not resemble the model, deny handoff even if names match — theft events sometimes send decoys.
Step 4: Confirm unit or street number
Apartment simulations love off-by-one digits (204 vs 240). Read numbers twice when the queue is loud.
Cross-check against building directories posted near the counter if the map UI provides them during certain Events.
Step 5: Scan for special flags
Some labels show fragile, signature required, or government. IDs for restricted mail may need extra prompts. Skipping flags counts as a mistake separate from name typos.
Step 6: Hand over only after verbal OK
Quietly say the name aloud (or subvocalize on console). Hearing “Sarah Chen” while the label reads “Sarah Chin” catches typos your eyes skimmed.
Common decoys and traps
| Trap | What happens | Safe response |
|---|---|---|
| Similar names | Wrong person accepts package | Full three-way match |
| Rush timer | UI flashes hurry | Slow down; timers rarely beat fire threshold |
| Friend co-playing | They swap places in line | Re-verify each new model |
| Thief disguise | Fake ID photo | Deny and alert — see Catch package thieves |
| Post-event chaos | Crowd surge after weather | Re-open ID panel; no memory handoffs |
Random events may temporarily hide parts of the ID UI. Wait for the overlay to clear — guessing during Handle random events is expensive.
Platform-specific readability tips
Desktop: mouse-hover tooltips sometimes enlarge text — use them between shifts to learn font styles.
Mobile / tablet: brightness up, UI scale maxed in Roblox settings. Fatigue misreads spike on small screens.
Console: sit closer to the display; use Roblox accessibility text options if available.
Full button mappings: Controls hub.
Mistake budget awareness
Each wrong ID typically consumes part of your shift allowance. Track totals with the shift mistake tracker so you know when to refuse risky deliveries even if customers complain.
If you are one mistake from firing, escalate caution:
- Reject ambiguous IDs and call supervisor prompts when offered
- Pause Catch package thieves chases unless mail is actively stolen — theft recovery is worthless if you already earned termination
Deeper firing math: Avoid getting fired.
Use the ID checklist during learning runs so every field gets a deliberate tick before confirm.
Drills for shift 1 through 7
Shifts 1–2: prioritize zero ID errors over speed. Finish late but clean.
Shifts 3–4: introduce parallel sorting — two packages staged, one customer at a time, never dual handoffs.
Shifts 5–7: expect lookalike pairs and partial name matches. Read every digit on unit numbers twice.
Long-form pacing: Survive seven shifts and Shifts hub.
ID checks vs promo codes
The Codes hub lists no active public promo codes as of August 2026. No string bypasses verification minigames. Group bonus perks from group 372114481 may cosmetically help but do not auto-verify IDs for you.
When to restart vs push through
If you knowingly misdelivered during a foggy random event, consider restarting the shift early (when the game allows) instead of stacking silent errors. Time lost restarting beats a FIRED animation locking progress for the session.
Related pages
- How to play
- Guides hub
- Tools hub
- Events hub
- Review for common player complaints about ID difficulty
Frequently Asked Questions
Quick answers players ask after every shift.
What happens if I skip ID verification?
The game usually logs a mistake immediately or at shift review. Enough mistakes trigger FIRED.
Do IDs change after random events?
Some events obscure the UI temporarily. Wait until panels are fully readable before confirming delivery.
Are photo mismatches always thieves?
Often, but not always. Deny the handoff and follow theft guidance if they run with a package.
How do I practice IDs without losing shifts?
Use shift 1 deliberately slow, track errors in the shift tracker, and review the full walkthrough on the Shifts hub between attempts.